

Initialize Next.js App with Supabase Database - Part 1
Supabase is a great tool for developers, who want to actually deliver their products to customers. It gives you a ton of features, so that you can focus on the important stuff, like building your app.
Read What is Supabase? to get an overview of the features and why you should give Supabase a try.
Prerequisites
- Node v20+ and NPM installed
- basic React and TypeScript knowledge
- basic Next.js 13+ knowledge
Supabase Database and API
Supabase provides backend as a service and naturally, one of the main features is its database and API to interact with it. Here we will look at how to create a simple To-do App that will use all of the basic CRUD operations.
Supabase offers REST API and GraphQL out of the box, and we can quickly utilize each of these ways to talk to our database. In this article we will be using the REST API. Let's jump right in.
Initialize Supabase and Next.js
For our front-end, we will be using Next.js with TypeScript, and we have 2 main ways to initialize the project with Supabase.
- create-next-app with Supabase
- create empty Next.js app and add Supabase
The first way will generate Next.js app with Supabase. In my opinion, it is way too noisy and there are just too many files that we don't really need, especially when just starting out with Supabase. So we will use the second way and start with an empty Next.js project and add Supabase manually. Open up your terminal in the folder that you want to create this project and install Next.js app with the following command:
npx create-next-app@latest
And answer the prompts as follows, to be able to follow along:
Need to install the following packages:
create-next-app@14.2.2
Ok to proceed? (y)
✔ What is your project named? … todo-app
✔ Would you like to use TypeScript? … No / Yes (YES)
✔ Would you like to use ESLint? … No / Yes (YES)
✔ Would you like to use Tailwind CSS? … No / Yes (YES)
✔ Would you like to use `src/` directory? … No / Yes (NO)
✔ Would you like to use App Router? (recommended) … No / Yes (YES)
✔ Would you like to customize the default import alias (@/*)? … No / Yes (NO)
Perfect, we have blank Next.js app. Open the created folder in your favorite text editor.
When we start our app with npm run dev we should see the template page created with the create-next-app. We can remove everything from page.tsx file and also from globals.css and add the following.
export default function Home() {
  return <div>Home</div>
}
@tailwind base;
@tailwind components;
@tailwind utilities;
These are the only things we need for now. We should see only white blank page with Home on it.
Create Supabase account and project
To use Supabase services, we need to create a free account. So let's head to Supabase homepage and click on Start your project in the upper right-hand corner.

Click on Sign up now and we can sign up with GitHub or basic email and password. After signup, confirm your mail and sign in. And we are in, perfect!
Creating a new project is very simple. Click on + New Project and fill in:
- Name (Project name)
- Database Password
- Region (Where you want to serve the application)
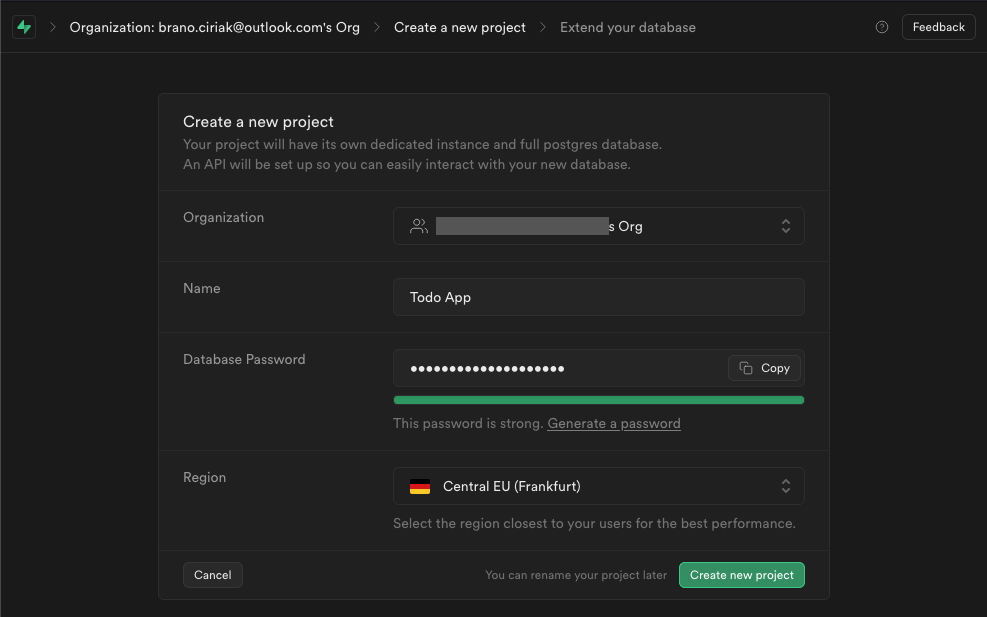
Click Create new project, Supabase will then initialize the project within a couple of minutes, and we are all set up!
Create database table to store data
Now we want to create a table in our database to store to-dos. We can create tables with migrations or in the Supabase UI. Since we are just starting with Supabase, we will use the nice and intuitive UI. In the left sidebar, we have Table Editor and this is where we can create and edit our tables.
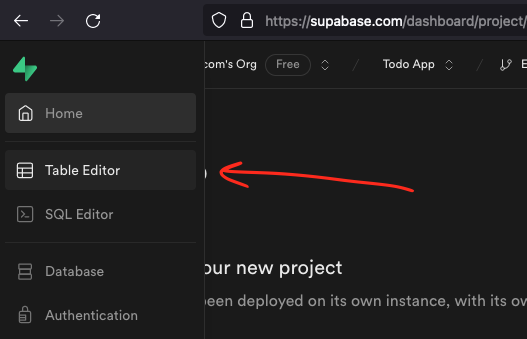
In Table Editor we click on Create a new table, we give it name Todos, description is optional so we can leave that blank. We need to disable Row Level Security (RLS) to be able to interact with our database without the need of signing in.
The last thing is to add 2 new columns to the table by clicking Add column button under the 2 default columns.
New columns:
- description: varchar
- is_complete: boolean, with default value
FALSE
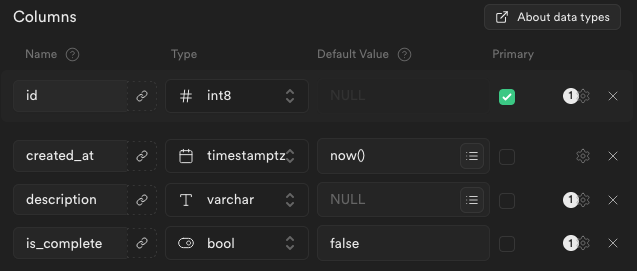
Click Save and we just created our Todos table, we are done with the Supabase setup for now.
Connect to Supabase from Next.js app
With Supabase ready, we can now connect to it from our app and start interacting with it. To connect, navigate to Home in Supabase and in upper right corner, there is Connect button. When we click on it, there are lots of options to connect to our Supabase instance. We want to go to App Frameworks and find Next.js using App router with supabase-js.
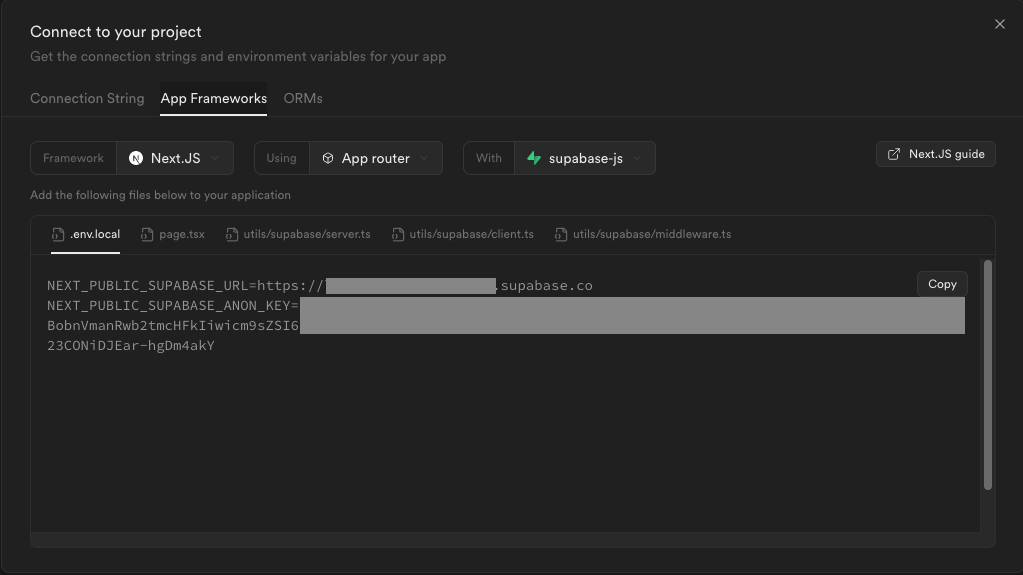
Copy the .env.local file contents and create one on our project root and paste the values in it.
With this done, we will now install Supabase JavaScript Client from npm:
npm install @supabase/supabase-js
Let's use it!
Read from Supabase Database
There are 3 things we need, to read data from our database.
- import Supabase
createClientfunction - create Supabase client
- query the database for data
But before we do this, we need to have some data in our table. Let's create two to-dos in our Todos table. The simplest way is to just jump back to Supabase app in the browser, head to the Todos table and insert some data.

The only thing we need to fill in, is the description all the other fields will be filled in by default.

Now we jump to our code editor, and we will connect to Supabase database from our Home component.
Make sure that this server component is async as we are reading the data asynchronously. Also, the name of the table we are reading data from must be case-sensitive, otherwise we would get an error.
Don't forget to run the app with npm run dev.
import { createClient } from '@supabase/supabase-js'

const supabase = createClient(
  process.env.NEXT_PUBLIC_SUPABASE_URL!,
  process.env.NEXT_PUBLIC_SUPABASE_ANON_KEY!
)

export default async function Home() {
  const { data, error } = await supabase.from('Todos').select('*')

  if (error) {
    console.error('error', error)
  }

  return (
    <div>
      <h1>Home</h1>

      {data && (
        <ul>
          {data.map((todo) => (
            <li key={todo.id}>{todo.description}</li>
          ))}
        </ul>
      )}
    </div>
  )
}
We are importing the createClient function, followed by creating the Supabase client. On line 9, we are querying the database with the client. Pay attention to the syntax, how intuitive and simple it is! Amazing. This call will return a couple of things, for now we are only worried about data and error.
Next, we check if there was any error, if so, we print it to the console. Remember, this is the console in our terminal or text editor, not the one in the browser, as this is a server component.
Last thing, we return JSX with the data. We should see those 2 to-dos that we inserted in our Supabase database.
Generate types from Supabase
Since we are using TypeScript, we should define types for our data, which we are not doing right now. Hovering over todo in the map function will show that it is of any type, which is a bad practice. We could create the type ourselves, which would be fine, but Supabase has us covered.
Install Supabase CLI
First thing we need, is Supabase CLI in our project. We can install it from npm by running:
npm i supabase --save-dev
Login to Supabase
Now we can log in into our Supabase project through this Supabase CLI:
npx supabase login
This command will open the browser and if you are already logged into your account, it will automatically proceed and return to your terminal.
Initialize Supabase project in your editor
Last thing before generating types is to initialize the project in our app. This will create supabase folder with some config and SQL files in it.
npx supabase init
Just leave everything default and we should be good to go.
Generate VS Code settings for Deno? [y/N]
Generate IntelliJ Settings for Deno? [y/N]
Finished supabase init.
Generate TypeScript types
Now we are ready to generate the types based on our database schema. No need to worry about creating it manually, which is great. Before we run the shell command, we need to create a folder in the root of our To-do App, named types, to store the types in it.
One thing we need to change in the following command, is the "$PROJECT_REF" which is just the ID of the Supabase project. We can copy it right from the browser. Go to the Home and in the URL we have https://supabase.com/dashboard/project/xyz. ID is the string following the project/. So don't forget to replace it in this command:
npx supabase gen types typescript --project-id "$PROJECT_REF" --schema public > types/supabase.ts
We should now see supabase.ts inside the types folder.
Using TypeScript type definitions
To use these type definitions, we simply need to add them to the createClient function like so:
import { createClient } from '@supabase/supabase-js'
import { Database } from '@/types/supabase'

const supabase = createClient<Database>(
  process.env.NEXT_PUBLIC_SUPABASE_URL!,
  process.env.NEXT_PUBLIC_SUPABASE_ANON_KEY!
)
First, we import the definitions and then add it to the createClient function.
If we now hover over the data variable, we will see all the types that we defined when we created Todos table.
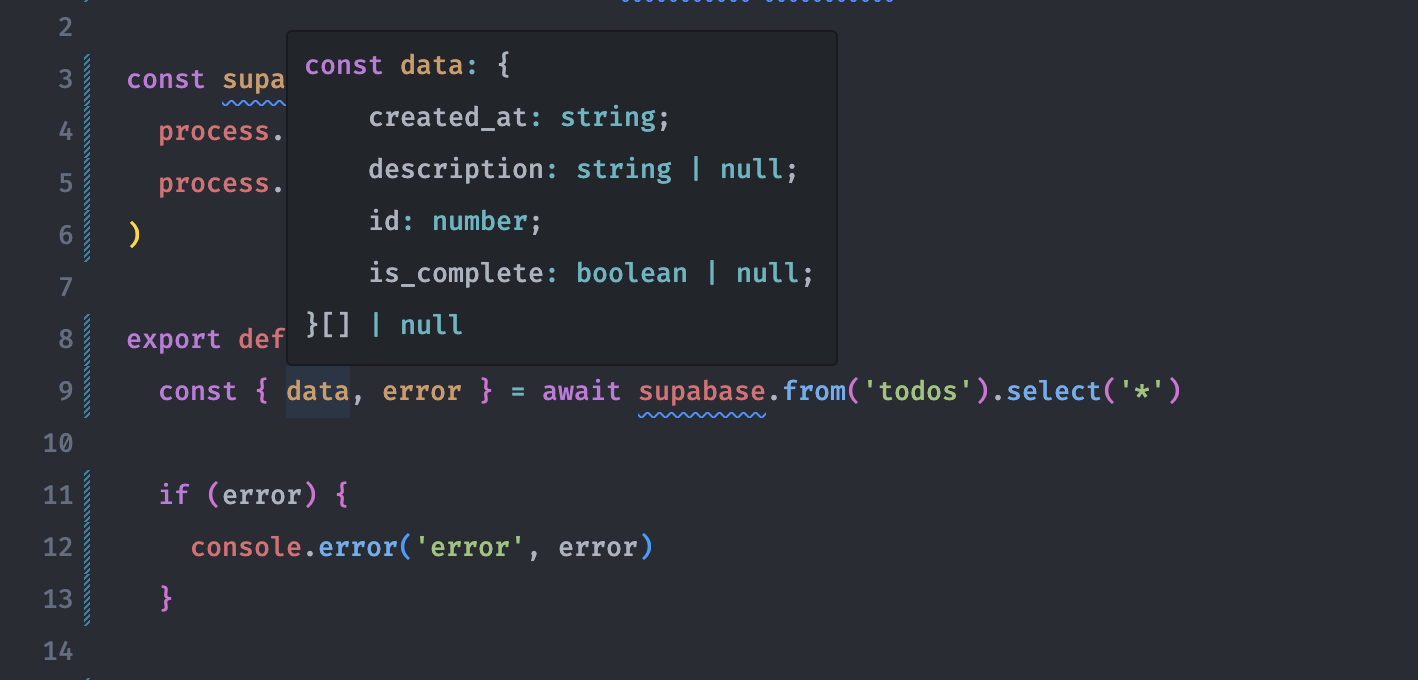
How nice is that! We can read the data from Supabase Database and we are set for the rest of our CRUD operations. Let's go to the next part.
Part 2 - Insert and Revalidate To-dos
Keep learning and see you in the next one!