
React useReducer with TypeScript
UseReducer and TypeScript is a good combo to tackle more complex component state problems. But how do they work together?
useReducer hook is one of Reacts API features that helps us manage state in React components. It has been added to react in version 16.8 along with other hooks.
Managing state with useReducer
You can think of useReducer as older brother of useState. Older meaning it can handle more complicated things.
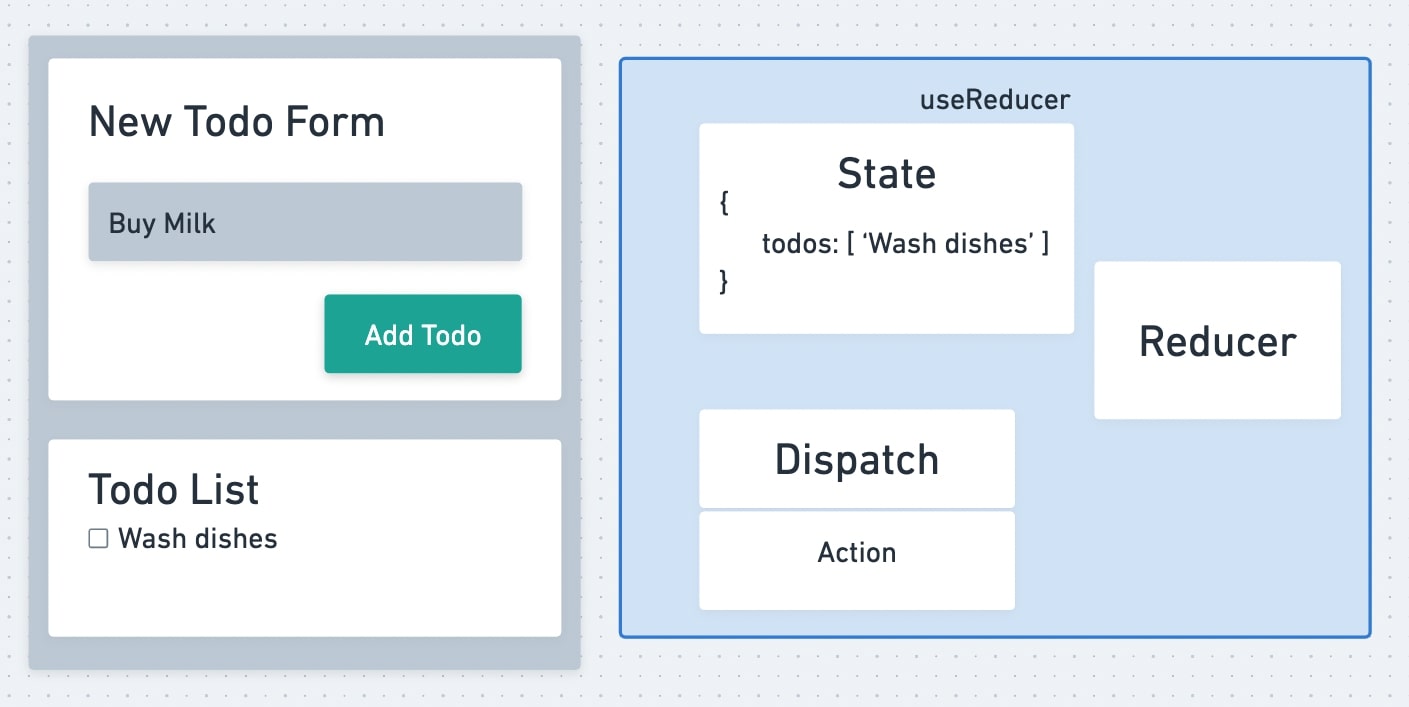
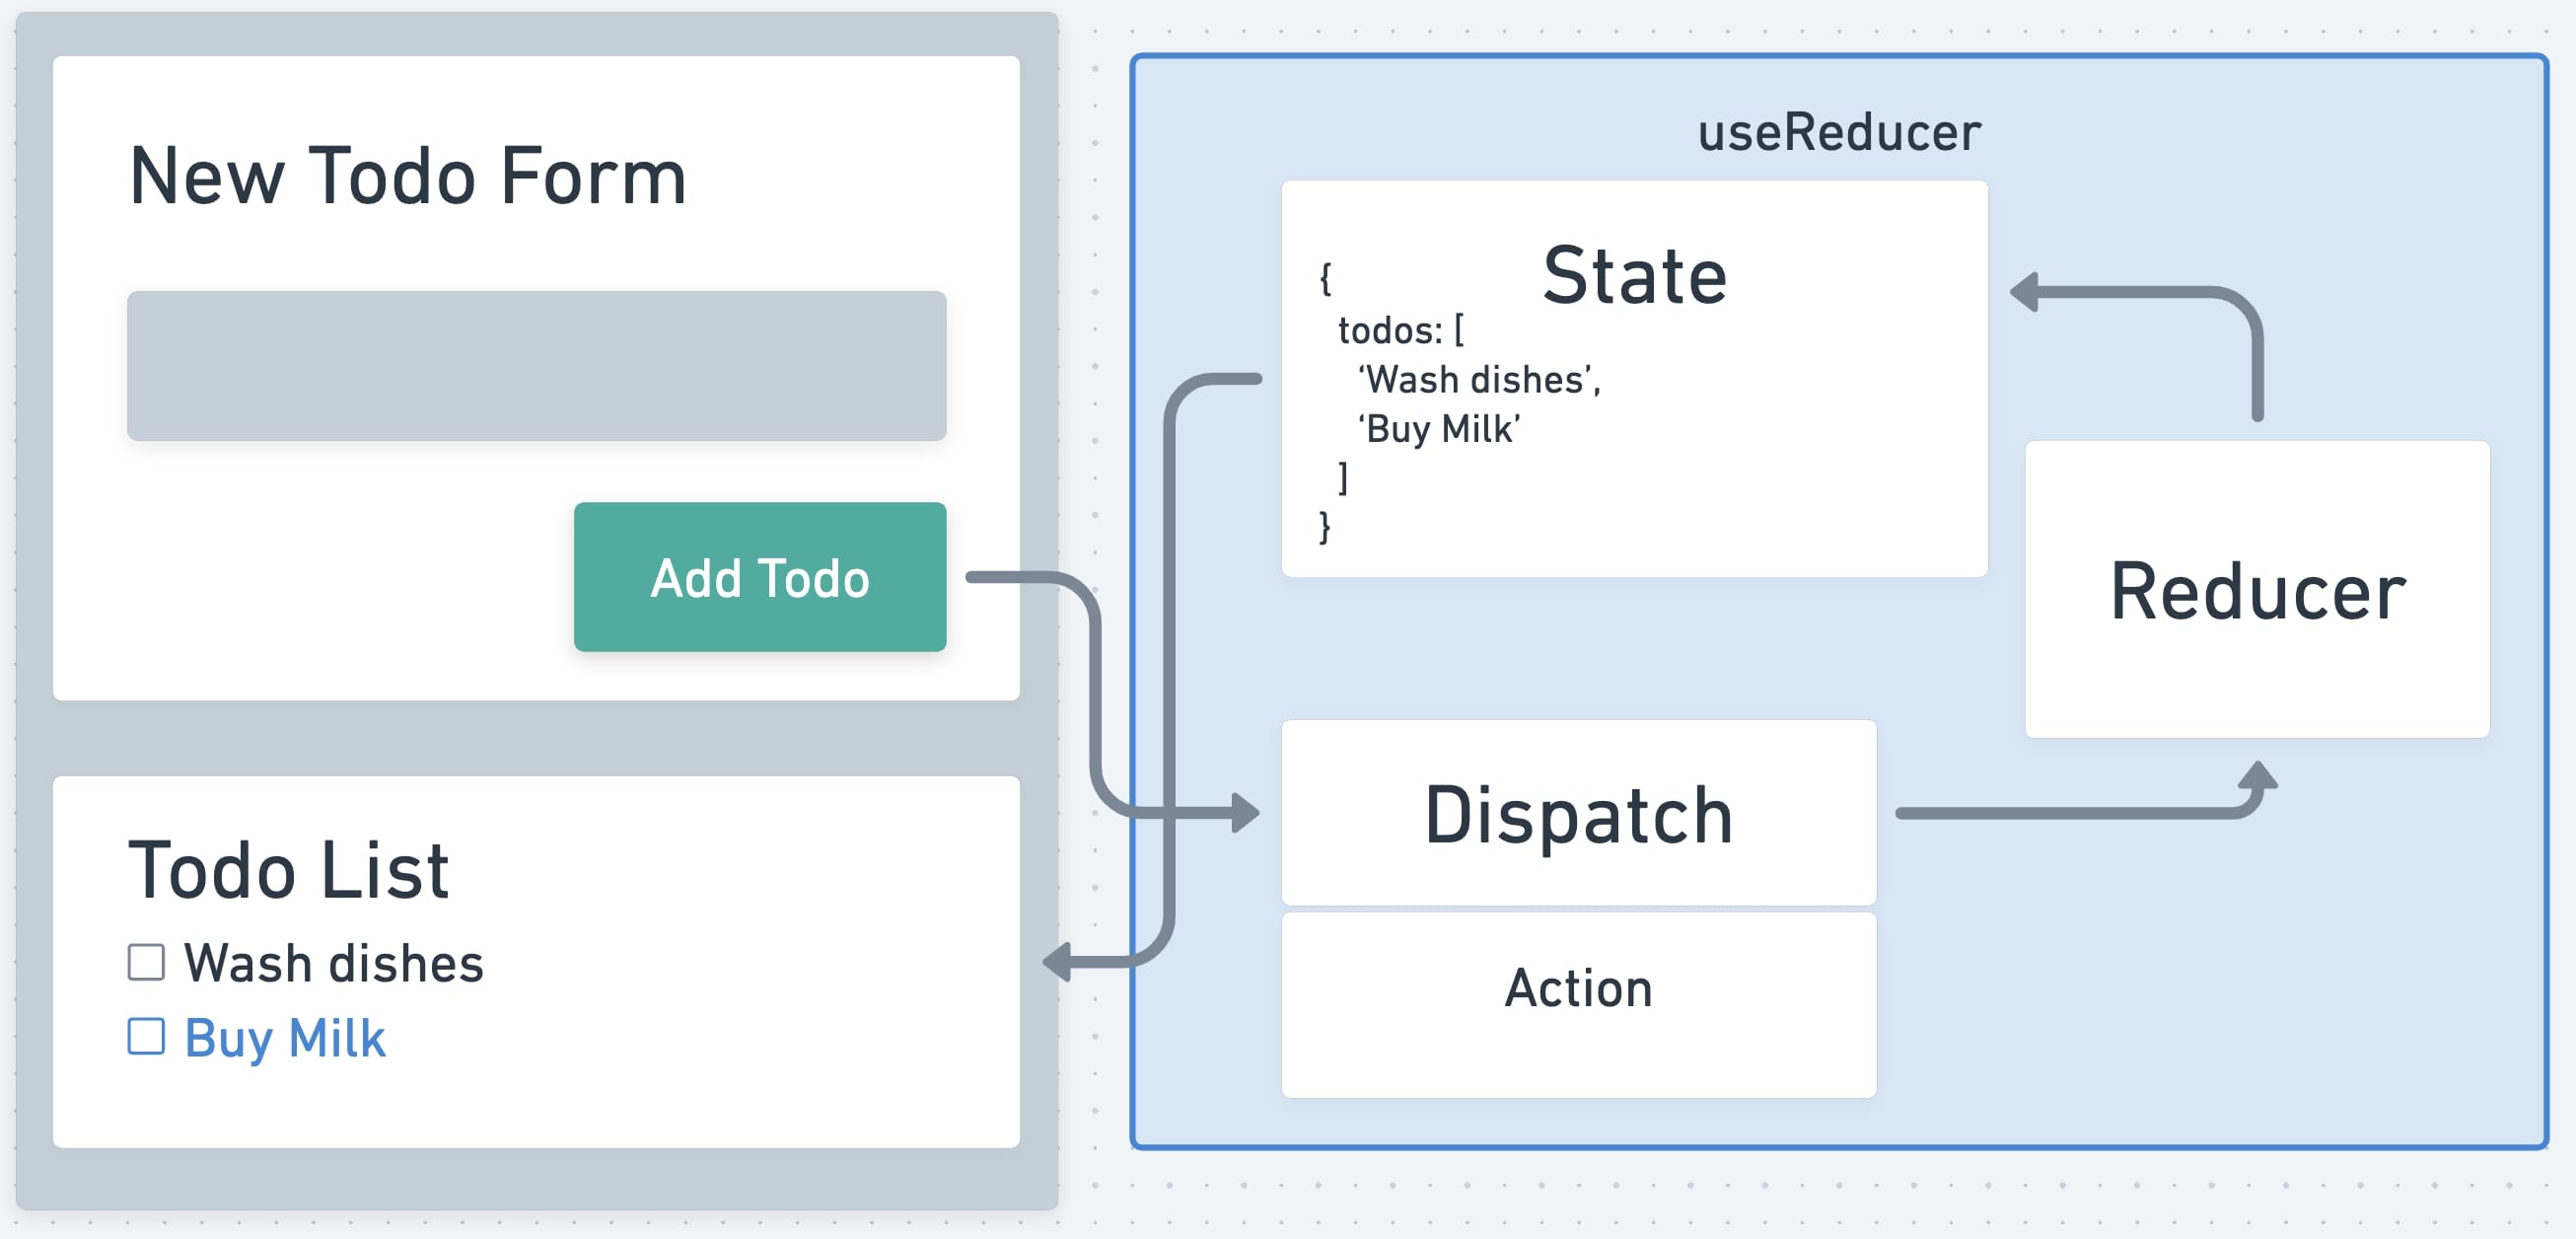
Following is a diagram of simple Todo App that we will reconstruct with useReducer.

On the left, we have mock of the app and on the right is useReducer with its 4 main parts, state, dispatch, action and reducer.
State
Well, state is the container that holds our information. This state can hold much more complex data than useState. Not that useState can't hold complex data, but its use is not suited for such a complex data.
For managing more complex state make sure to look at Context API with useReducer and TypeScript.
Dispatch
Dispatch is a special function given to us by useReducer and it is some kind of messenger between our UI and state. In this example we could have different changes that we would want to do to our state. Like adding a todo or removing todo. Dispatch is the one carrying the message what we want to do with our state. The message would be action in our case.
Action
Action is plain object that specifies what we want to do with our state. Here is an example of adding a todo action:
{
	type: "ADD_TODO",
	todo: "Buy Milk"
}
So dispatch is the messenger and action is the message.
Reducer
Now we come to the last piece of useReducer, the brains. Reducer itself is where all of the logic happens. Reducer is pure function, that looks at action and decides how to change state. It has access to currentState and that is how we update it. But we never mutate state in reducer, we just copy it and return new state.
Back to the Todo App
Looking at the previous picture, we see that there is already some initial state, todos array. If we want to add a Todo to this array, we would click on Add Todo button, which would fire useReducers' dispatch function with appropriate action. In this case "ADD_TODO", and it would be handled by reducer, which would update the state. React would look at the state, see the change and re-render our UI.

Alright, to better understand how useReducer works, especially with TypeScript, let's build this simple app.
Learn more about advantages of TypeScript.
Clean React TypeScript app with Vitejs
I am gonna create barebones React TypeScript app with Vitejs, an amazing tool for creating Front-end applications.
If you don't know Vite, have a look at Create React App With Vite.
To create React app with TypeScript, make sure to use this command:
npm create vite@latest my-react-app --template react-ts
First thing I will do, is to remove all the noise from App.tsx and get to this point:
function App() {
  return (
    <div>
      <h1>Todos</h1>
    </div>
  )
}

export default App
I also don't like the dummy styling included with Vite, so I just removed everything from index.css. Now if we run npm run dev, we should be all set.
Adding useReducer
Let's add useReducer to our app. And we will do this in a silly way, so that we can understand it a little better.
To initialise useReducer, we need to supply 2 arguments to this hook. Reducer and initial state. As I mentioned before, reducer is pure function returning state. initialState is object holding our state/data.
import { useReducer } from 'react'

  const initialState = {
    todos: [],
  }

  const reducer = (state: any, action: any) => {
    return state
  }

  function App() {
  const [state, dispatch] = useReducer(reducer, initialState)

    return (
      <div>
        <h1>Todos</h1>
        <pre>{JSON.stringify(state, null, 2)}</pre>
      </div>
    )
}

export default App
First, we imported the useReducer hook itself from 'react'. We created initialState object with one key todos, initialised to an empty array. Underneath is our dummy reducer, doing only one thing right now, returning state. It also has 2 arguments (for now typed as any), first one is the actual state that we have access to in reducer and second is our action.
Inside our App component we initialise the useReducer with our reducer and initialState.
Last little detail is the pre tag, to display our state.
JSON.stringify is function to, well, make string out of JSON. But we can nicely format the outputted string, by supplying 2 more arguments. Second argument is 'replacer' and this can be function, array or null, used in case we want to somehow manipulate the output, e.g. we don't want some of the properties to be shown in the JSON string. And the last one is 'space', meaning how we want to indent and line break characters, for better readability.
Using our useReducer to add a Todo
First of all, we need a button to be able to add a Todo.
<button onClick={() => dispatch({ type: 'addTodo', payload: 'Buy Milk' })}>
  Add Todo
</button>
We are using dispatch function given to us by the hook and supplying it with hardcoded action object for now. Don't worry, we will improve this solution.
The only thing missing is now some logic in reducer that will handle the action and update state accordingly.
const reducer = (state: any, action: any) => {
  switch (action.type) {
    case 'addTodo':
      let newTodos = [...state.todos, action.payload]
      return { ...state, todos: newTodos }
    default:
      throw new Error(\`Unhandled action type: \${action.type}\`)
  }
}
For those of you familiar with Redux, this syntax in reducer should be very simple to understand. switch statement is perfect for this situation, but you could very well use if else statement to make this logic work.
Right now we have 2 options how the switch can go. Default state will throw error if the action.type will be unknown, and addTodo will add new todo to our state. Remember, we don't want to mutate the state, that is why we first copy the todos from current state by destructuring it ...state.todos and then we simply add our new todo from action.payload to that new array.
Last thing to do, is to copy our whole state, again by destructuring the state object and overwriting the todos with our newTodos array.
We should now be able to add our hardcoded todo to the state, by clicking the Add Todo button.
Improving useReducer with typing
Looking at our App, besides those two any parameters in the reducer function, it is just regular old JavaScript component. It would be shame not to use the power of TypeScript, so let's get into it.
Good place to start is our state. Let's give our state proper types so that we can get some benefits of TypeScript:
type Todo = {
  id: number
  description: string
}

type State = {
  todos: Todo[]
}

const initialState: State = {
  todos: [],
}
Here we created 2 simple types, Todo and State. Now we know exact structure of our todo list. Every todo needs to have an id and a description, and our todos array is array of those todos.
In a same way we can add types to the reducer function.
const reducer = (
  state: State,
  action: { type: string; payload: Todo }
): State => {
  switch (action.type) {
    case 'addTodo':
      let newTodos = [...state.todos, action.payload]
      return { ...state, todos: newTodos }
    default:
      throw new Error(\`Unhandled action type: \${action.type}\`)
  }
}
Pretty simple, we just got rid of those any types, which by the way are never a good sign. You should never use those. Also, check out the return type of the reducer. It always returns State.
With this change, we also need to update the dispatch function call in our onClick. It is just a simple change of switching the payload to the correct type:
<button
  onClick={() =>
    dispatch({
      type: 'addTodo',
      payload: { id: 123, description: 'Buy Milk!' },
    })
  }
>
  Add Todo
</button>
Awesome, with these changes we know what to expect in our action, and in our state.
Adding more data to the state
Having hardcoded value as a Todo is truly not very useful. Let's change that by adding an input field, and handle all of it with our useReducer. But before we do that, we can improve our reducer by removing plain strings from our cases.
It is great practice to extract usages of plain strings into constants, this way we will not make simple typo and introduce bug.
...
const ADD_TODO = 'addTodo'
...
switch (action.type) {
	case ADD_TODO:
...
As we will add more types of actions, we will just add corresponding constants.
Back to the input for our todo.
<input
  type="text"
  value={state.newTodoValue}
  onChange={(e) =>
    dispatch({
      type: UPDATE_VALUE,
      payload: { description: e.target.value },
    })
  }
/>
This is how the input looks like. We are handling its value with our state, which we will add to initialState in just a second. Another thing is, the UPDATE_VALUE. This means we will need to also update our reducer to handle this action case.
...
const ADD_TODO = 'addTodo'
const UPDATE_VALUE = 'updateValue'
...
type State = {
	todos: Todo[]
	newTodoValue: string
}

const initialState: State = {
	todos: [],
	newTodoValue: '',
}
...
This should be pretty straight forward, we just took advantage or useReducer and added another piece of state, which will handle the input value. And we just initialised it to an empty string.
Onto the reducer:
const reducer = (
  state: State,
  action: { type: string; payload: Todo }
): State => {
  switch (action.type) {
    case ADD_TODO:
      let newTodos = [...state.todos, action.payload]
      return { ...state, todos: newTodos, newTodoValue: '' }
    case UPDATE_VALUE:
      return { ...state, newTodoValue: action.payload.description }
    default:
      throw new Error(\`Unhandled action type: \${action.type}\`)
  }
}
Notice that we added the newTodoValue to our ADD_TODO case and set it to an empty string. This is just to clear the input after we added the todo.
The UPDATE_VALUE case is just updating the input field and the description of new todo.
One last change we need to do, is the dispatch action in our button since we want to have different IDs for our todos and more importantly, we want the description to be the value of the input.
<button
  onClick={() =>
    dispatch({
      type: ADD_TODO,
      payload: {
        id: state.todos.length + 1,
        description: state.newTodoValue,
      },
    })
  }
>
  Add Todo
</button>
Phew, that was quite a few small tweaks. But now we should have fully working Todo App where we manage state with the use of useReducer hook and TypeScript.
Here is the full App component if you want to just glance through it all at once:
import { useReducer } from 'react'

const ADD_TODO = 'addTodo'
const UPDATE_VALUE = 'updateValue'

type Todo = {
  id?: number
  description: string
}

type State = {
  todos: Todo[]
  newTodoValue: string
}

const initialState: State = {
  todos: [],
  newTodoValue: '',
}
const reducer = (
  state: State,
  action: { type: string; payload: Todo }
): State => {
  switch (action.type) {
    case ADD_TODO:
      let newTodos = [...state.todos, action.payload]
      return { ...state, todos: newTodos, newTodoValue: '' }
    case UPDATE_VALUE:
      return { ...state, newTodoValue: action.payload.description }
    default:
      throw new Error(\`Unhandled action type: \${action.type}\`)
  }
}

function App() {
  const [state, dispatch] = useReducer(reducer, initialState)

  return (
    <div>
      <h1>Todos</h1>
      <input
        type="text"
        value={state.newTodoValue}
        onChange={(e) =>
          dispatch({
            type: UPDATE_VALUE,
            payload: { description: e.target.value },
          })
        }
      />
      <button
        onClick={() =>
          dispatch({
            type: ADD_TODO,
            payload: {
              id: state.todos.length + 1,
              description: state.newTodoValue,
            },
          })
        }
      >
        Add Todo
      </button>
      <pre>{JSON.stringify(state, null, 2)}</pre>
    </div>
  )
}

export default App
I hope you liked this more in depth article. If you did leave a reaction or a comment down below.
Keep learning and see you in the next one!